Frequently Asked Questions
Welcome to our FAQ page. We hope you find the information you're looking for. Feel free to contact us if you need further assistance. Simply click on any of the questions below to reveal the answer. Clicking the question again will hide the answer.
File Preparation FAQ
-
1. What file format should my file be?Open or Close
Please prepare your file as a high-resolution PDF file with bleed.
-
2. What colour mode should my file be?Open or Close
Your files should always be in CMYK colour mode. Converting other colour modes into CMYK may result in a colour shift. For best results, the design file should start off in CMYK colour mode.
-
3. What resolution is preferred for final artwork and images?Open or Close
The preferred resolution for images and artwork is 300DPI.
-
4. Is there a size limit for my artwork files?Open or Close
We ask that all artwork files have a maximum file size of 250 megabytes. This is to ensure that there are no delays in your turnaround due to file retrieval and processing time. If your file is larger than 250MB, we recommend compressing and optimizing your file. If this is not possible, please provide us your file via CD, DVD, USB flash drives or another form of storage device.
-
5. What is a bleed and why do I need to include it in my artwork?Open or Close
A bleed is a term used in the printing industry when you have printing that goes right to the edge of the paper. The bleed is extended artwork on all sides of your piece to allow for cutter variance. Items such as background and design elements should always extend out of the trim margin.
A 1/8" bleed is required on all four sides of your artwork.
Failing to provide bleed information and crop marks can result in the printed product showing a thin area of white on the edge.
If your file does not consist of bleed, it will be rejected by our prepress department and we will request a new file with bleed. This can result in delaying the completion of your job.


- 6. How do I make sure my text and images don't get cut off?Open or Close
Safe Margins are 1/8" away from the cut line. The type safety area is a guideline that help you keep important elements in your design away from the edge of your artwork so that text and images will not be cut off when trimmed down to the final size.
- 7. Can I have a frame or border around my artwork?Open or Close
YES, but we recommend that you avoid borders. If the border is too close to the cutline, it may result in the final product being slightly off-centre. It is also strongly suggested that you do not use a thin border around your postcard, poster, brochure or other printing product. If you are designing your file with a border around the edges, it must be a minimum of 1/4" wide, plus the 1/8" we need for bleed. Due to physical limitations of guillotine cutting, borders thinner than that will most likely appear uneven. We are not responsible for type, art or images that are cut off if these guidelines are not followed.
- 8. All images must be embedded and all type must be embedded/outlined. Open or Close
The file you upload to See2it must have images and fonts embedded or outlined in order to properly process your file.
Adobe InDesign:
Window > Links
Choose the image you want to embed from the list and click on the arrow and select "Embed File".
Adobe Illustrator:
Window > Links
Choose the image you want to embed from the list and click on the arrow and select "Embed Image".
How to convert text to outlines:
Select your text box. Under the Type menu select Create Outlines.
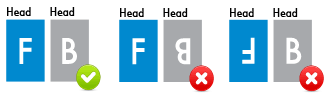
- 9. How to ensure proper orientation for a multi-page file.Open or Close
When you are submitting a multi-page file for your order, pages must be head-to-head to ensure proper orientation. For example, the top of Page 1 (Head) must match up with the top of Page 2 when they are placed back-to-back. The first example below is correct where the text is facing the same way for the front and the back of the business card. The second and third example are incorrect as the text is upside down on one side.
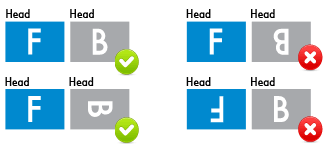
Here are some other examples of acceptable layouts:
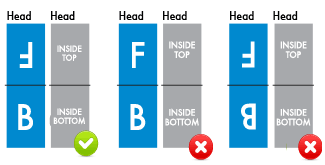
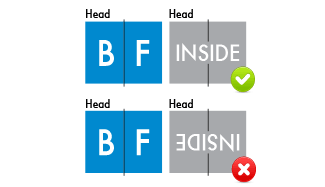
When dealing with folded jobs that open vertically the front and the back are always facing the opposite directions:
- 10. Check files for overprint issues.Open or Close
Overprinting refers to the process of printing one colour on top of another. If you do not want this to happen make sure that the overprint options are turned off and switched to knockout in your document. When overprint is applied, instead of knocking out elements behind the foreground elements, one ink is printed over another. It almost looks like a transparency type effect. Below are three squares — magenta, cyan and yellow. In the image on the left, the overprint fill is turned off. In the image on the right, the overprint fill is turned on.
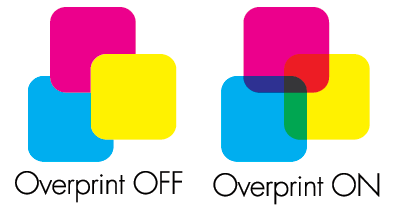
A classic mistake is when a white foreground element is layed on top of a black background element and overprint fill is applied to the white foreground element. It will look just fine in the pdf file (unless you have the overprint preview selected) but when it is separated in your printer's rip, the white will disappear.
The simple thing to remember is to never apply overprint fill to a foreground element that is lighter than the background. While there may be some exceptions to this rule, this is a general rule of thumb.
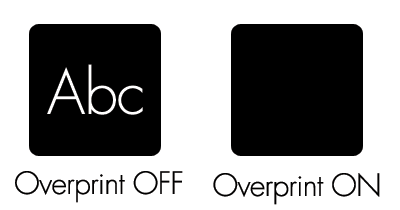
Please note that our file preview does not display overprint issues. Therefore, it is critical to check your file for overprint issues before uploading the file to us.
- 11. Transparency issues with PMS colours.Open or Close
Transparency effects are generally not preferred in printing, and only on screen. It causes ripping issues and elements to disappear. To prevent this, do not use any shadow, glows or transparency on top of a spot colour. Always convert your spot colour to CMYK before using any transparency effects.
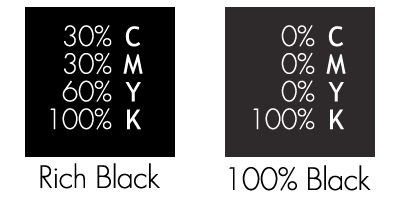
- 12. Rich black and Total Ink Coverage.Open or Close
We are limited to a maximum ink coverage of 300%. Anything over can result in a variety of print related issues such as cracking.
To create Rich Black, you can use a mixture of 30% Cyan, 30% Magenta, 60% Yellow and 100% Black. Rich Black is best used for larger areas of black, and not on thin lines or text. If you use it on small body text or thin lines, the inks could saturate and blur the artwork.
100% Black is created using a mixture of 0% Cyan, 0% Magenta, 0% Yellow and 100% Black. For large areas, 100% Black looks grayish. For small text, it helps keep the text sharp as there is no combination of CMYK to register.
- 13. Black text.Open or Close
We require 100% K for black text (0% C, 0% M, 0% Y, 100% K). Rich black should not be used for type or thin lines because it will result in fuzziness and misregistration issues.
- 14. Blue and Purple.Open or Close
Blues and Purples has always been a problem in the printing industry because the two colours are so close together in the CMYK spectrum. In order to ensure the two colours come up the correct tones, leave at least 15% differences in your Cyan and Magenta Values. (Example: 100% C, 85% M, 0% Y, 0% K)
For print to look Blue: Cyan > Magenta by 15%.
For print to look Purple: Cyan < Magenta by 15%.
- 15. Red and Orange.Open or Close
Red and Orange are also problematic on press because the two colours are close together in the CMYK spectrum. In order to ensure the two colours come up the correct tones, leave at least 15% differences in your Magenta and Yellow Values. (Example: 0% C, 100% M, 85% Y, 0% K)
For print to look Red: Magenta > Yellow by 15%.
For print to look Orange: Magenta < Yellow by 15%.
- 16. What's the difference between Vector and Raster images?Open or Close
Vector images use mathematical equations to define each component of an image. This allows vector images to retain their high-quality at any size. Programs like Adobe Illustrator, Corel Draw, or Adobe Freehand uses vector graphics. For maximum clarity, vector images should be used for all text and logos whenever possible. They result in the clearest image and can be re-sized without losing resolution.
A raster image is composed of a collection of tiny dots called pixels. When these pixels are small, and placed close together, they fool the eye into forming a single image. Raster images work great when subtle gradations of colour are necessary. Because they contain a fixed number of pixels, a major disadvantage of raster images is that their quality suffers when they are enlarged or otherwise transformed.
- 17. Can you printform field data in my PDF?Open or Close
We highly recommend not including any form field data in your PDF file. There is a likelihood that the data or text will not print out correctly on the finished product.
- 18. How do I setup my file for embossing/foil stamping?Open or Close
We require a separate file for embossing/foil stamping. We prefer a solid vector image in 100% black wherever embossing/foil stamping is required. Please dont send us an outline of what is required as the finished product will have an outline emboss/stamp instead of a solid.
Shipping FAQ
-
1. What shipping service do you offer?Open or Close
We ship with UPS and offer two types of courier service – UPS Standard and UPS Express.
-
2. Can we split jobs and ship to different locations?Open or Close
Each order can be shipped to only one location. If you need jobs shipped to multiple locations, you must place separate orders. Shipping information must be provided prior to processing your order.
-
3. Can you combine my shipments?Open or Close
In order for individual jobs to be shipped together they must be ordered at the same time within the same order.
-
4. Can I pick up my order?Open or Close
Sorry, we do not offer pick-up service at this time. We do, however, have great shipping rates and aside from some large format items, shipping is free for printing purchases of $150 or more.
-
5. Which locations do you ship to?Open or Close
We can ship to any location within Canada.
-
6. Can you ship individual items in my order separately?Open or Close
All items within an order will be shipped together. Your order can be expected to ship out when all of its individual items are ready. Therefore, an appropriate turnaround estimation for your order will be equal to the general turnaround for the item within the order that has the longest turnaround time. For example, an order that contains magnets with a standard turnaround is expected to ship from our facility 7 business days after the order is placed, regardless of the turnaround for the other items.
It is highly recommended that RUSH ORDER items are ordered separately to ensure that they are shipped out on time.
-
7. Can you ship my job to a PO Box?Open or Close
Unfortunately we are unable to ship your order to a PO Box.
General FAQ
-
1. What do I do if there is a problem with my order?Open or Close
If there is a problem with your printed job please contact us at support@see2it.ca. In your email please include the job number, a description of the problem and a picture/scan of the product. After we have received your email, a representative will contact you.
-
2. Where can I download a template guide to help me design my artwork?Open or Close
Currently, templates are not available on our website but they will soon be located on each individual product page. If you would like a template for your order, please contact us at support@see2it.ca and indicate the product and size you require.
-
3. Can I order a custom size for my job?Open or Close
If the size of the product you want is not listed, please fill out our quote form or contact us at quote@see2it.ca and include as much information about your project as possible such as the quantity needed, colour or black and white printing, flat and finished dimensions, paper stock, finishing and/or bindery requirements. The estimating department will get back to you with a quote within 24 hours(1 business day).
-
4. How do I contact production about special instructions regarding my job?
Open or Close
Contact support@see2it.ca and include your order number with special instructions regarding your job. If your request is not possible, a representative from See2it will contact you before we process the job. However, we recommend contacting customer support to see whether these special instructions can be accommodated before placing your order.
-
5. What if I have a custom job for a product that is not listed on the See2it website?Open or Close
If you don't see the product you're looking for, please fill out our quote form or contact us at quote@see2it.ca and include as much information about your project as possible such as the quantity needed, colour or black and white printing, flat and finished dimensions, paper stock, finishing and/or bindery requirements. The estimating department will get back to you with a quote within 24 hours(1 business day).
-
6. How do I make changes to my order after it has already been placed?Open or Close
Due to the automated system that we use, you may not be able to make changes to your order once it has been placed. If your order has already been imposed or plated, you will be unable to make most changes (i.e. artwork, size, stock, etc). Our prepress operators cannot be responsible for making any alterations/changes to the files submitted for printing.
To request a change, call 416-858-5365 or send an email asap to support@see2it.ca with your changes. Include your order's item number and we will try our very best to accomodate you.
If you requested a PDF Proof or Colour Proof and determine that you need to submit a new file, you can do so by contacting us at 416-858-5365. Due to the time it takes to pre-flight and prep your files, a $30 fee will be assessed (in addition to the cost of the proof) each time you submit new artwork and this fee must be paid prior to sending you a new proof. If you need to submit new files because the original files were corrupt you will not be charged.
-
7. What happens if my file is rejected?Open or Close
After submitting your job to See2it, the file will go directly to our prepress department for preflighting. If our prepress department has confirmed your file is not printable, they will reject your job and an email will be sent out to you requesting a new file. When sending the new file, please do not reorder your job as a new job.
-
8. How do I request samples?Open or Close
Request a samples by emailing us at support@see2it.ca. Title your message as 'Samples' and, in the body of your message, include your name, company name and mailing address along with the type of samples you would like to see. We'll mail out samples as soon as possible via Canada Post.
-
9. Can I order a folded card that doesn't fold right in the middle?Open or Close
When ordering your folded card, be sure to indicate where the job should be scored. It is also recommended to upload a file called "Proof" indicating where the score should go. Please mention in your message that a "Proof" file has been uploaded.
-
10. If I order an 8 page booklet is it actually 16 pages since there's a front and back side?
Open or Close
An 8 page booklet is actually 8 pages. To accurately count pages in a book start by counting the cover as page one and the inside cover as page two and so on. In an 8 page booklet, page eight would be the outside back cover.
Large Format FAQ
-
1. Can you guarantee flute direction for Coroplast Signs?Open or Close
If you choose the H Stand Ready option, we will produce your signs with vertical flutes to facilitate the use of H Stands. If the H Stand Ready option is not selected, your signs will be produced with either vertical or horizontal flutes. Requests to guarantee horizontal or vertical flutes may incur additional charges.
-
2. Will my signs be printed the exact size that I order them?Open or Close
The vast majority of the time, yes. Very rarely, we may print your signs at 99.5% of the original size to ensure that we are able to include the cut marks for proper finishing and trimming.
Envelope FAQ
-
1. What does open end and open side mean when referring to envelopes?Open or Close
Open end refers to the flap being on the short side of the envelope while open side refers to the flap being on the long side.
Roll Labels FAQ
-
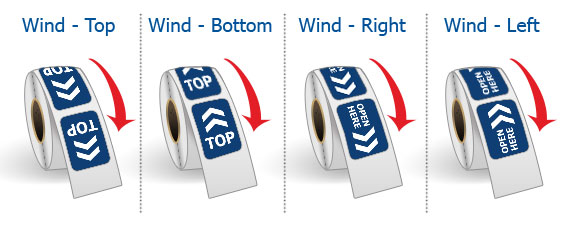
1. What is the wind position?Open or Close
Wind position refers the positioning of the label as you unwind it from its roll. This is particularly important if the labels are automatically placed on an object using a machine.
Spot UV FAQ
-
1. What is the general tolerance for the positioning of the spot UV?Open or Close
Positioning of the spot UV cannot be 100% guaranteed. Please note that there may be a shift of approximately 1/8" in the spot UV position on the printed product.
ScrollUnaddressed Admail FAQ
-
1. What is Unaddressed Admail?Open or Close
With unaddressed admail, postcards are not addressed and simply delivered to residences and businesses within a certain geographic area. They are perfect for letting people know you're in the area, reaching new customers and raising brand awareness.
-
2. What is a Target Address?Open or Close
When placing your Unaddressed Admail order with See2it, you can choose a Target Address. The mailers you order will be delivered by Canada Post to potential customers within the same postal route as the target address.
-
3. What does your service include?Open or Close
With our Unaddressed Admail service we print, sort, bundle and deliver your mailers to Canada Post for distribution.
- 6. How do I make sure my text and images don't get cut off?Open or Close